Headlights are one of the most exposed and vulnerable parts of any vehicle. Positioned at the very front, they face constant impact from stones, grit, insects, road debris, and UV exposure. Over time, this leads to pitting, hazing, yellowing, and even cracks, all of which reduce clarity, affect night‑time visibility, and can lead to costly replacements.
Velderra Headlight Protection Film is designed to prevent this and give you a clean, invisible layer of protection that absorbs impact and shields the lens from long‑term wear. The film is optically clear, self‑healing, and engineered to conform to curved surfaces, making it ideal for both modern LED units and traditional halogen housings.
This guide walks you through how to install Velderra Headlight Protection Film with confidence, along with simple, stress‑free solutions for any small issues you might encounter along the way.
Why Headlight Protection Matters
Headlights face a unique combination of hazards:
Stone chips from motorway driving
UV exposure that causes yellowing and hazing
Road debris that pits and scratches the lens
Insect acids that etch into the surface
Winter grit and salt that accelerate wear
Replacing a headlight can cost hundreds of pounds, sometimes more for LED or matrix units. Even mild hazing reduces brightness and can lead to MOT advisories or failures.
Velderra Headlight Protection Film prevents this damage before it starts, keeping your headlights clear, bright, and looking new for years.
Why Choose Velderra Headlight Protection Film
Velderra’s film is engineered specifically for DIY installation, with features that make the process smooth and beginner‑friendly:
Optical clarity that preserves headlight brightness
Self‑healing surface that removes light marks with heat
Flexible film designed to conform to curves
Invisible finish that blends seamlessly with the lens
This combination of design and flexibility makes headlight PPF one of the most satisfying installations for DIY-ers and car enthusiasts.
What You’ll Need
- Velderra Headlight Protection Film
- Velderra Slip Solution
- Velderra Tack Solution
- A small squeegee
- Microfiber cloths
Optional: a hairdryer or heat gun on low setting (not included, and for gentle shaping only)
Important note about slip and tack solutions
Velderra Headlight Protection Film is designed to work specifically with the Velderra Tack and Slip Solutions supplied in your kit. Using any other tack solution, including homemade mixtures or third‑party products, may damage the surface of your headlamps and/or affect adhesion and will invalidate the product warranty. This isn’t meant to be restrictive; it’s simply to ensure you get the best possible result with a formula tested specifically for our film.
Preparing the Headlights
Preparation is key to a clean, clear installation.
- Carefully wash the headlights with car shampoo to remove all traces of dirt and road film.
- Rinse thoroughly and dry with a clean microfiber cloth.
- Wipe the lens with a damp microfiber cloth to remove any remaining residues.
- Ensure the surface is clean, smooth, and free from all contaminants.
This gentle cleaning method is safe for all modern headlight materials and provides a perfect surface for the film to bond.
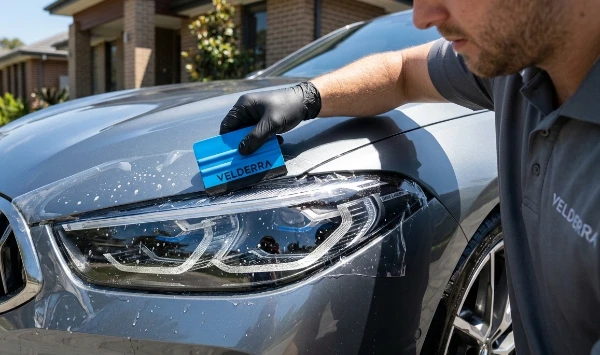
Positioning the Film
1. Spray the headlight generously with the Slip solution.
2. Peel the Velderra film from its backing and spray the adhesive side.
3. Place the film onto the headlight and let it float into position.
4. Align the edges so the film sits evenly across the lens.
Smoothing the Film
Headlights often have gentle curves, so work slowly and methodically:
- Start from the centre and push the Slip solution outward with your squeegee.
- Follow the natural shape of the lens.
- Use short, overlapping strokes for even pressure.
- If the film catches or drags, add more slip solution.
The film will begin to settle and conform to the headlight’s contours.
Securing the Edges
Once the main surface is smooth:
- Spray a light mist of Velderra Tack Solution along the edges.
- Press the edges down firmly with the squeegee.
- If the headlight has tight corners, warm the film gently to help it relax.
The film will grip the lens securely as it dries.
Common Installation Issues and How to Correct Them Easily
Velderra Headlight Protection Film is designed to be straightforward and easy to install. If you do encounter small challenges along the way, they’re all very easy to correct. The film is flexible, forgiving, and allows you to make adjustments until everything looks exactly right.
Small Air Pockets on Curves
If you see a small pocket forming on a curved section, it’s very easy to correct. Lift just the affected area, apply a little slip solution, and smooth it back down. The film relaxes instantly and conforms to the curve.
Slight Haze after Installation
If the film looks slightly hazy at first, this is simply moisture beneath the surface. It clears on its own as the film dries, leaving perfect optical clarity.
Edges Lifting on Tight Corners
If an edge isn’t gripping immediately, a light mist of Velderra Tack Solution helps it bond. Press it down with the squeegee and it will stay firmly in place.
Alignment Not Quite Right
If the film isn’t sitting exactly where you want it, lift it gently, re‑wet the area, and reposition it. The adhesive resets cleanly while wet.
Tiny Dust Specks
If a tiny piece of dust gets trapped under the film, it’s very easy to remove using a simple technique called the Peel and Flood method. This lets you clear the speck quickly without disturbing the rest of the installation.
To correct it, lift the film just enough to reach the dust, only a small section needs to be raised. Spray a little slip solution underneath to “flood” the area, which washes the speck away and gives you a clean surface again. Once the dust is gone, lower the film back into place and smooth it down with your squeegee. The adhesive resets perfectly, and the film will settle back into a clear, even finish as it dries.
This quick method keeps everything clean and controlled, and it works beautifully even if the dust speck is close to an edge or curve.
Final Checks and Aftercare
Inspect the headlights from different angles. The film should sit flush, with sealed edges and a smooth, clear finish. Any small moisture marks will disappear as the film cures.
For the first 24 hours:
Avoid washing the car
Avoid pressure washing the edges
Allow the film to settle naturally
Once cured, the film becomes extremely durable and self‑healing, providing long‑term protection against everyday wear.
A Small Upgrade with a Big Impact
Headlights are expensive to replace and easy to damage, but protecting them is simple. Velderra Headlight Protection Film gives you a clean, invisible barrier that keeps your headlights clear, bright, and looking new for years. With our simple DIY kits and a forgiving installation process, it’s one of the most effective upgrades you can make to your vehicle.